Solutions


Automated Add to Calendar Events – The Direct URL Method
Updated Jun 26th, 2025 by Nicolas Zenker

Welcome to AddEvent’s Automated Add to Calendar Events – previously known as the Direct URL Method. This is one of the most powerful tools AddEvent offers. At the most basic level, the Automated Events tool consists of URLs that your users can click to add your event to their calendars. These URLs contain different parameters that you can directly edit to customize the URL to your specific event. This very important for the reasons listed in the next paragraph.
Please note: this tool requires basic to advanced coding knowledge.
What Should I Use It For?
Since the end-result of the Automated Add to Calendar is a URL-link that your users can click to add your event to their calendar, you can use it in a wide variety of situations such as on your website, in emails, and on social media. That said, the ability to directly edit the URL to customize its Add to Calendar functionality for a specific event makes the Direct URL Method ideal for two distinct uses. Please note: if you want to share your event through an Add to Calendar button on your website, please use the Add to Calendar Button, as this tool does not support that sharing option.
How do I use it?
Automated Events consists of three different URL templates, each of which accomplishes a different task. Here is a brief summary of what each URL does:
- The first URL allows you to attach .ics calendar event files to your emails, which will then appear as a block of information above the event within the email body (we provide an example of this below)
- The second URL creates an Add to Calendar link that redirects your users to an automatically generated event page from which they can add your event to their calendar.
- The third URL creates an Add to Calendar link for each of the major calendar clients that when clicked, downloads a calendar file or redirects your user right to that calendar client, depending on the calendar client chosen. (Think of this as skipping over the landing page step and instead just immediately adding the event to their calendars.)
Each URL has various parameters that can be customized to make the URL specific to each new event. When you integrate one of the URLs into the back end of an email template within a Mail API, you can link the parameters to your system or event database as *|MERGE| tags that will pull in the appropriate data for each new event. This means that for each automated email sent out to your users, you won’t need to manually customize the URL so that it corresponds to the appropriate event. If one of your users signs up for a webinar at 10:00am, the URL will automatically pull information from your database that the event is at 10:00am, and thus when your user receives an email about the event, and they add it to their calendar, it will be your event starting at 10:00am. If another user signs up for a webinar at 12:00pm, the URL will pull in the appropriate information for that event, and when your user adds it to their calendar, they’ll add your event starting at 12:00pm. If you’re sending out thousands of emails a month, that’s thousands of emails with Add to Calendar links that you don’t need to manually update. Now let’s work through an example more thoroughly and see what the emails will actually look like.
A great example
Meet Sarah. Sarah works for a rapidly growing tech startup called GenericTech Inc. She’s in charge of running the company’s email marketing campaign, for which she uses HubSpot. GenericTech has decided to offer a series of online classes for their customers on how to best utilize their products. There is a sign-up form on GenericTech’s website where customers can sign up for one of 5 classes, each held on a different day. GenericTech asks Sarah to set up a campaign that automatically sends a confirmation email when customers sign up. They’d also like to include a way for customers to easily add the class to their calendars so they won’t forget to attend.
Fortunately, Sarah knows about AddEvent’s Automated Events and thus has the perfect solution. She decides to use the URL that attaches an .ics calendar file to an email.
The template URL looks like this: (tip: always start with this original template when using this URL)
https://www.addevent.com/dir/?client=CLIENT&start=START&end=END&title=TITLE&timezone=TIMEZONESarah integrates this exact URL template into the back end of the confirmation email she has designed on HubSpot. The template URL has five parameters that can be changed to customize the URL for a specific event. Sarah edits the CLIENT field, changing it to her client ID (tip: paying customers can find this on their AddEvent account page). She then makes the START, END, TITLE*, and TIMEZONE parameters *|MERGE|* tags that link into GenericTech’s system. Thus every time a confirmation email is automatically sent to a customer, these tags pull in the appropriate information for the class that customer selected. So if the customer selected the Tuesday class, the .ics calendar file attached to the email will be specifically for the Tuesday class. When the customer clicks that link to add the class to their calendar, it will add the Tuesday class to their calendar with the correct title, date, start and end times, and timezone for that event. Each time an email is sent out, it will automatically pull in (through the *|MERGE|* tags) the correct data for the specific class the customer selected.
* Tip: the TITLE is the name of the event that users will see
When Sarah launches the campaign, Automated Events works perfectly, attaching a .ics calendar file to each confirmation email with the correct details for the chosen class. In addition to a .ics file attached at the bottom of the email, most major calendar applications display the event details in the body of the email itself. This is how Google presents the event in one of Sarah’s emails:
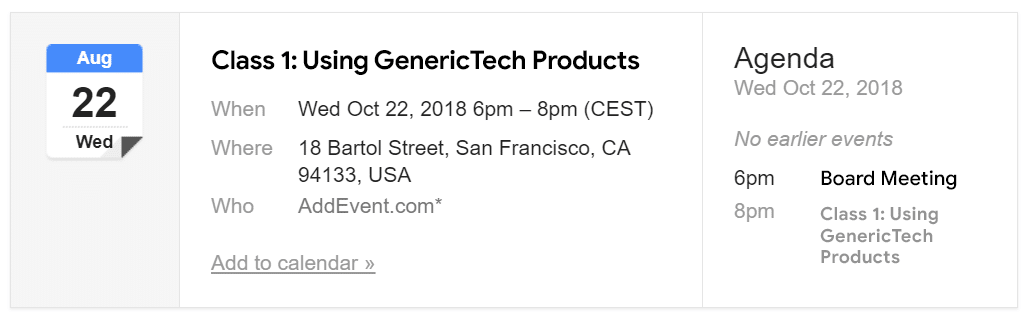
And that’s it. Isn’t it beautiful?
The other two URL templates work the exact same way – the only difference is the end result. The first URL template includes a link in the email body like this one: Add event to your calendar. The user experience is simple and intuitive – people can click the link and are taken to a landing page like the one shown below.
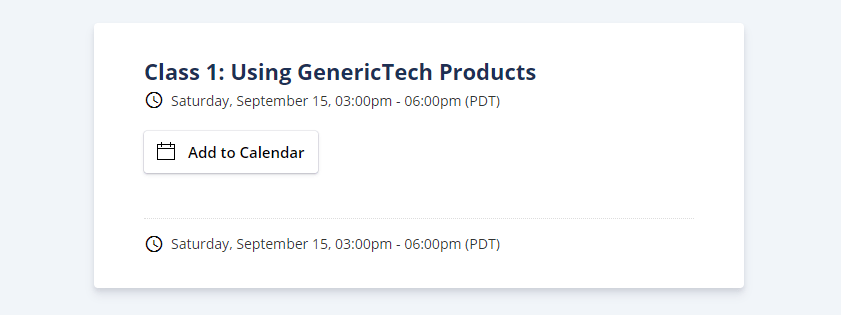
From here they simply click the button to add the event to their calendar. Done. The third URL again works the same way with almost the exact same parameters. The major difference is that clicking the link adds the event to users’ calendars without first sending them to a landing page. This URL includes the following links in the email body. When clicked, each link adds your event to the respective calendar application.
Add event to your calendar: Apple Calendar • Google Calendar • Outlook Calendar • Outlook.com • Yahoo Calendar
Seamless integration into your existing Mail APIs. Powerful automation. Automated Events makes it easy for you to send Add to Calendar links in emails that look clean and professional and make it easy for the recipients to add your events to their calendars. This increases the number of your events that end up on their calendars, and results in your top-of-mind brand awareness and event attendance rates going through the roof.
For more information, please visit the Automated Add to Calendar tool page. For more technical information on how to use the URLs and edit various parameters, please visit the Automated Add to Calendar documentation.
Sign up today to use the Automated Add to Calendar and discover the difference it can make in your business.